
Upgrading from Free to Individual Plan
Transitioning from a free account to an individual plan opens up a world of enhanced features and benefits.
This comprehensive guide will walk you through the upgrade process, ensuring you can seamlessly access the full potential of our services. Whether you're looking to expand your capabilities or take advantage of premium features, we've got you covered with this detailed walkthrough.
Steps to Upgrade Your Account
-
Log into Your Account
- Visit our website and click on the login button
- Enter your credentials to access your dashboard
-
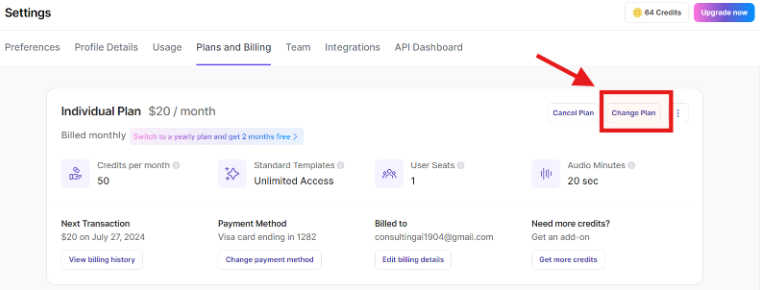
Navigate to "Plans and Billing"
- Look for the "Plans and Billing" or "Subscription" option in your account menu
- This section contains all information related to your current plan and available upgrades
-
Explore Upgrade Options
- Review the various individual plans available
- Compare features, pricing, and benefits of each plan
-
Select Your Desired Plan
- Choose the individual plan that best suits your needs
- Click on the "Upgrade" or "Select Plan" button next to your chosen option
-
Review Order Details
- Carefully check the plan details, pricing, and billing cycle
- Ensure all information is correct before proceeding
-
Enter Payment Information
- Provide your preferred payment method (credit card, PayPal, etc.)
- Enter all required billing information
-
Confirm Upgrade
- Review the terms and conditions
- Click the "Confirm" or "Complete Upgrade" button to finalize your purchase
-
Access Enhanced Features
- Once your upgrade is complete, you'll have immediate access to your new features
- Explore your enhanced account capabilities
Key Benefits of Upgrading
- Expanded Feature Set: Gain access to premium tools and functionalities.
- Increased Usage Limits: Enjoy higher usage caps on various features.
- Priority Support: Receive faster and more personalized customer support.
- Advanced Analytics: Access detailed insights and performance metrics.
- Exclusive Content: Unlock premium templates, resources, or content libraries.
Important Considerations When Upgrading
- Billing Cycle: Understand when your new billing cycle will begin and how it affects your current subscription.
- Feature Activation: Some features may require additional setup or activation.
- Data Migration: If applicable, learn how your existing data will transfer to the new plan.
- Cancellation Policy: Familiarize yourself with the terms for downgrading or cancelling if needed.
- Training Resources: Check for available tutorials or guides to make the most of your new features.
Tips for a Smooth Upgrade Experience
- Assess Your Needs: Clearly define your requirements before choosing a plan.
- Compare Plans: Carefully review all plan options to ensure you select the most suitable one.
- Test New Features: After upgrading, explore and test all new features to maximize your investment.
- Set Up Notifications: Configure usage alerts to manage your new plan effectively.
- Schedule a Review: Plan to reassess your needs after a few months to ensure the chosen plan still aligns with your requirements.
References
For more detailed information on our plans and upgrade policies, please refer to:
Updated 5 months ago
If you need assistance with the upgrade process or have any questions, our support team is here to help:
- Email: [email protected]