AI Article Writer 6: 10 Step Article
Step 1: Start Your Article - Choose Your Topic
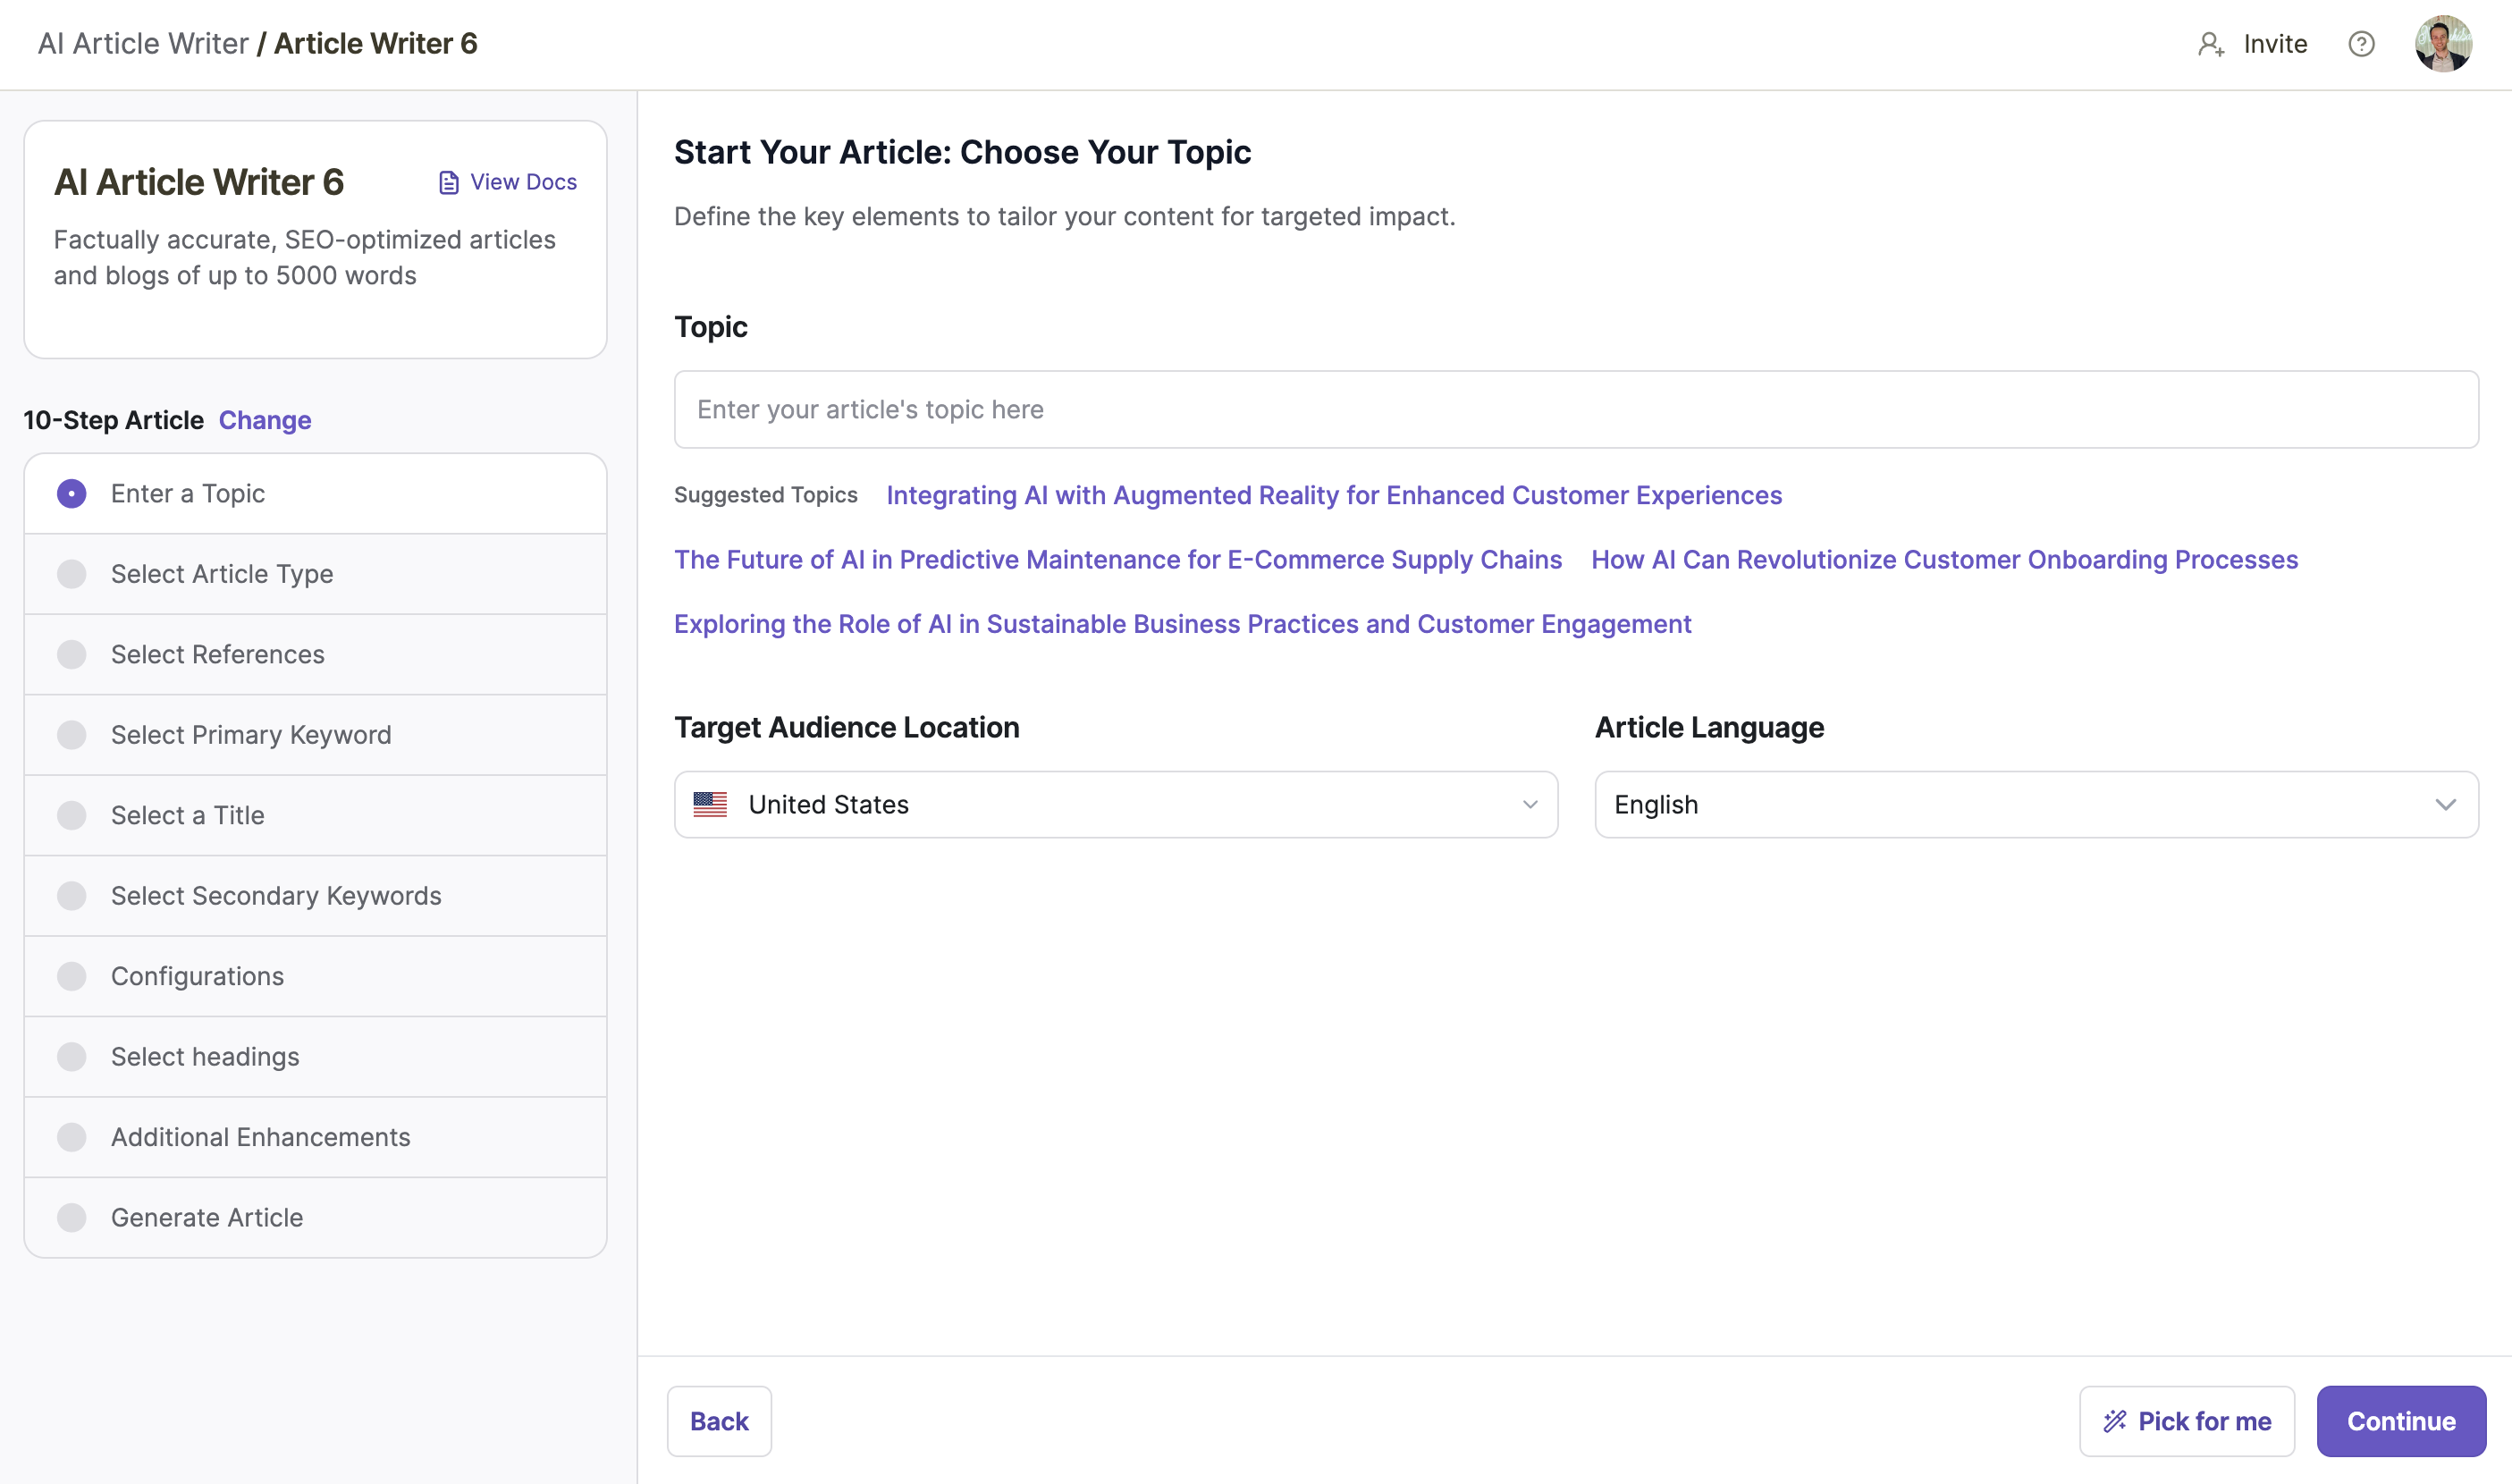
When you first open Article Writer 6, you’ll see a clean interface with several options to customize your article creation process. Let’s go through each element on this page to ensure you understand how to use it effectively.
1. Topic Selection
At the top of the page, you’ll see a text field labeled “Topic”:
- This is where you enter the main subject of your article.
- Be as specific and clear as possible. The more precise your topic, the better the AI can generate relevant content.
- If you’re unsure what to write about, look below the text field for “Suggested Topics”. These are AI-generated ideas that can inspire your writing.
Tip: You can click on any suggested topic to automatically fill it into the topic field. This can save you time and potentially inspire new ideas.

2. Target Audience Location
Below the topic field, you’ll find a dropdown menu for “Target Audience Location”:
- By default, this is set to “United States”.
- Click on the dropdown to see a list of countries and regions.
- Select the location that best represents where your target readers are based.
- This helps the AI tailor the content to specific regional interests, cultural nuances, or local SEO requirements.

3. Article Language
Next to the location dropdown, you’ll see another dropdown for “Article Language”:
- The default setting is “English”.
- Click on the dropdown to see other language options.
- Choose the language in which you want your article to be written.
- Make sure this matches your target audience and the location you selected.

Additionally
- Pick for me: Next to the “Continue” button, there’s a “Pick for me” option. If you’re unsure about any selections, clicking this will allow the AI to make choices for you.
Tips for Optimizing Step 1:
- Topic Selection:
- Be as specific as possible. Instead of “AI in Business”, try “AI Applications for Small Business Customer Service Improvement in 2024”.
- Include your primary keyword in the topic to guide the AI’s content generation.
- If you’re struggling to come up with a topic, use the suggested topics for inspiration.
- Target Audience Location:
- Choose a location that best represents your primary readership. This helps tailor content to local interests and SEO requirements.
- If writing for a global audience, consider using a neutral location like the United States.
- Remember, you can always create multiple versions of an article for different regions if needed.
- Article Language:
- Ensure the chosen language matches your target audience and selected location.
- If you’re creating content for a multilingual audience, you may need to create separate articles for each language.
- Quality Settings:
- Match the quality setting to your content needs:
- Use “Good” for quick drafts, social media posts, or less critical content.
- Choose “Superior” for most blog posts, articles, and product descriptions.
- Opt for “Elite Quality” for cornerstone content, whitepapers, or when you need the highest level of research and writing.
- Consider your credit budget when selecting a quality tier. Higher quality requires more credits but can save significant time and effort in the long run.
- If you’re unsure, go ahead with “Superior” and adjust from next article generation based on the results.
General Tips:
- If you’re new to Article Writer 6, start with a simple topic and the “Good” quality setting to familiarize yourself with the process before moving to more complex projects.
- Take your time with this step. The choices you make here will significantly influence the content generated in subsequent steps.
- Don’t hesitate to use the “Pick for me” option if you’re unsure. You can always refine these choices in later steps.
- Remember, you can always go back and adjust your selections if needed.'
Step 2: Article Type and Research Method
After completing Step 1, you’ll move to the “Article Type and Research Method” page. This step is crucial in determining the structure and content of your article. Let’s break down each element on this page:
1. Article Type
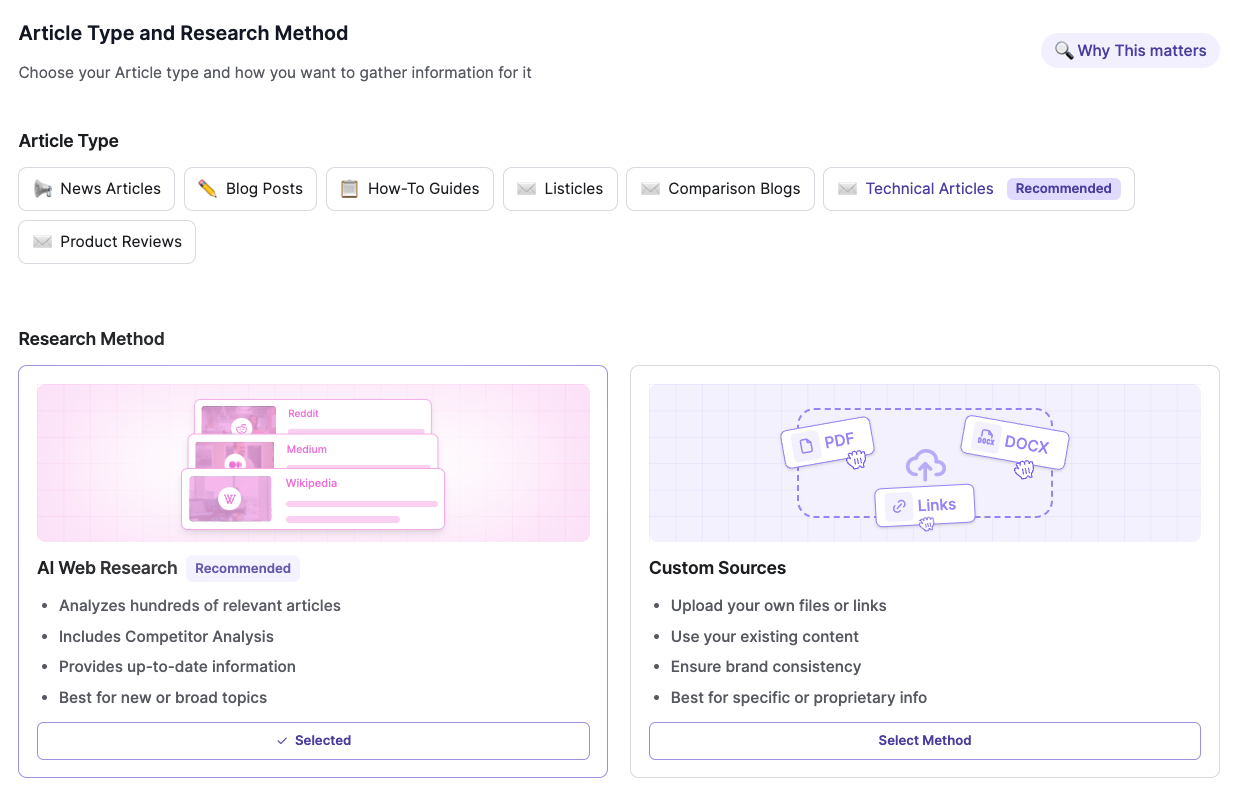
At the top of the page, you’ll see several options for Article Type:
- News Articles
- Blog Posts
- How-To Guides
- Listicles
- Comparison Blogs
- Technical Articles
- Product Reviews
Each type is represented by an icon and label. The “Recommended” option is highlighted in purple, but you’re free to choose any type that best fits your content needs.

How to choose:
- Click on the icon that represents the type of article you want to create.
- Consider your topic and audience when selecting the article type. For example, if your topic is “Utilizing AI for Predictive Customer Behavior,” a Blog Post or Technical Article might be most appropriate.
2. Research Method
Below the Article Type section, you’ll find two options for Research Method:
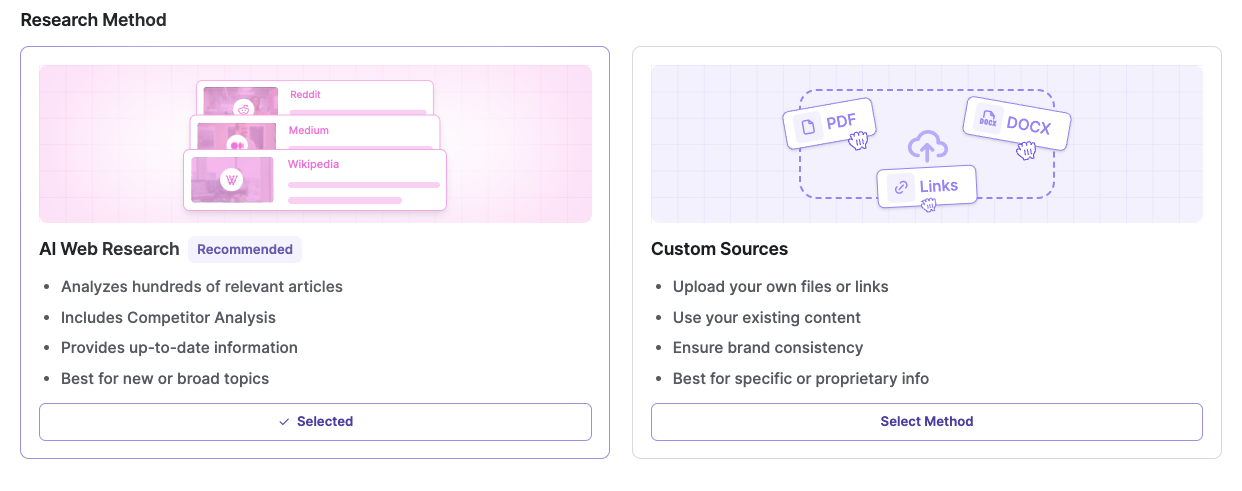
A) AI Web Research (Recommended)
- This option is pre-selected and highlighted in pink.
- Features:
- Analyzes hundreds of relevant articles
- Includes Competitor Analysis
- Provides up-to-date information
- Best for new or broad topics
B) Custom Sources
- This option allows you to use your own research materials.
- Features:
- Upload your own files or links
- Use your existing content
- Ensure brand consistency
- Best for specific or proprietary info
How to choose:
- If you’re writing about a general topic or want comprehensive research, stick with the pre-selected AI Web Research.
- If you have specific sources you want to use or are writing about proprietary information, select “Custom Sources” by clicking the “Select Method” button.
Additional Features
- Why This matters: At the top right of the page, you’ll see a purple “Why This matters” button. Clicking this will provide more information about the importance of selecting the right article type and research method.
- Pick for me: Next to the “Continue” button, there’s a “Pick for me” option. This allows the AI to make selections for you if you’re unsure.
Tips for Optimizing Step 2:
1. Article Type Selection:
- Consider your audience and the purpose of your content when choosing an article type.
- News Articles: Best for current events or timely information.
- Blog Posts: Ideal for informative, engaging content on various topics.
- How-To Guides: Perfect for step-by-step instructions or tutorials.
- Listicles: Great for easily digestible, scannable content.
- Comparison Blogs: Useful for product comparisons or contrasting ideas.
- Technical Articles: Suitable for in-depth, specialized topics.
- Product Reviews: Ideal for detailed analysis of specific products.
2. Research Method:
- AI Web Research is generally the best choice for most topics, especially if you want comprehensive, up-to-date information.
- Choose Custom Sources if:
- You have specific documents or links that must be included in your research.
- You’re writing about proprietary information not available online.
- You need to ensure strict adherence to your brand’s existing content.
3. General Tips:
- If you’re new to Article Writer 6, start with the recommended options (usually Blog Posts and AI Web Research) to get familiar with the process.
- Don’t hesitate to use the “Why This matters” button for more context on your choices.
In the next steps, we’ll dive deeper into refining your article’s focus and structure.
Step 3: Select References(Top-Performing Competitor Articles)
After choosing your article type and research method, you’ll move to the “Select Top-Performing Competitor Articles” page. This step is crucial for optimizing your content strategy by analyzing successful articles in your niche. Let’s break down each element on this page:
1. Add Your Own
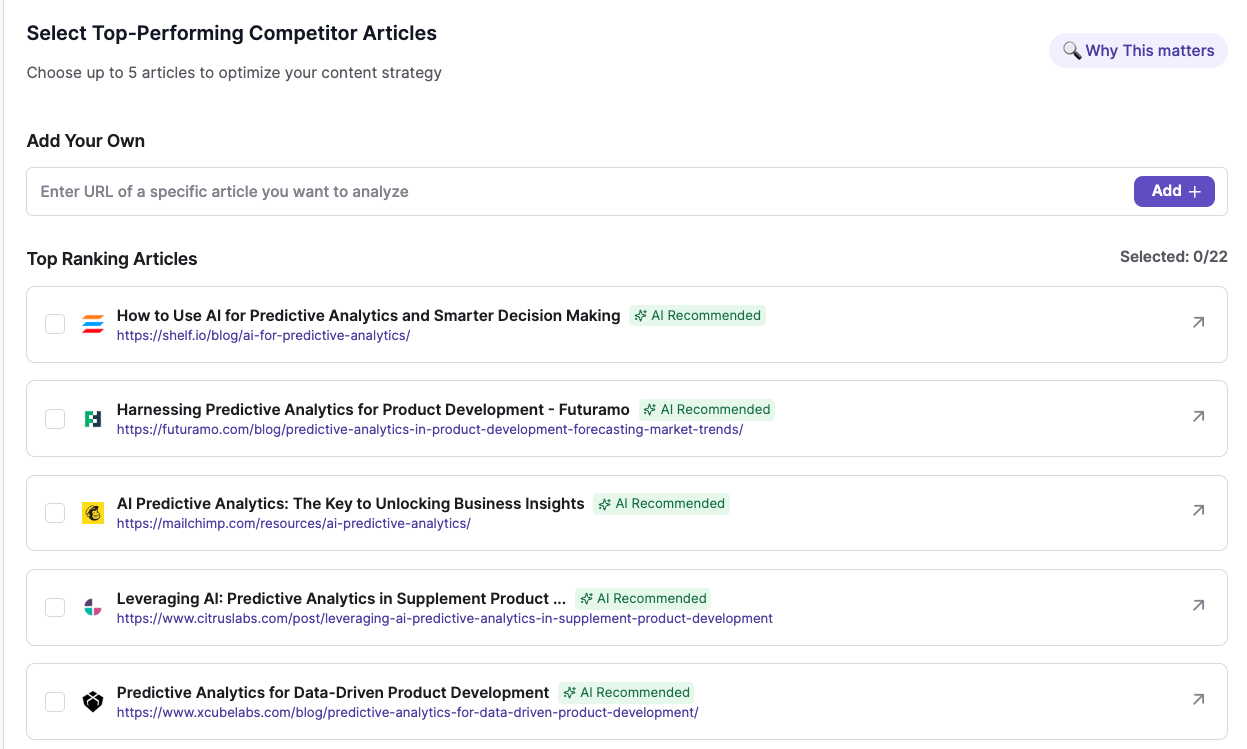
At the top of the page, you’ll see a text field labeled “Enter URL of a specific article you want to analyze”:
- Use this field to input the URL of any article you want the AI to consider as a reference.
- After entering the URL, click the purple “Add +” button on the right to include it in your analysis.
- This feature is useful if you have specific competitors or high-quality articles you want to emulate.
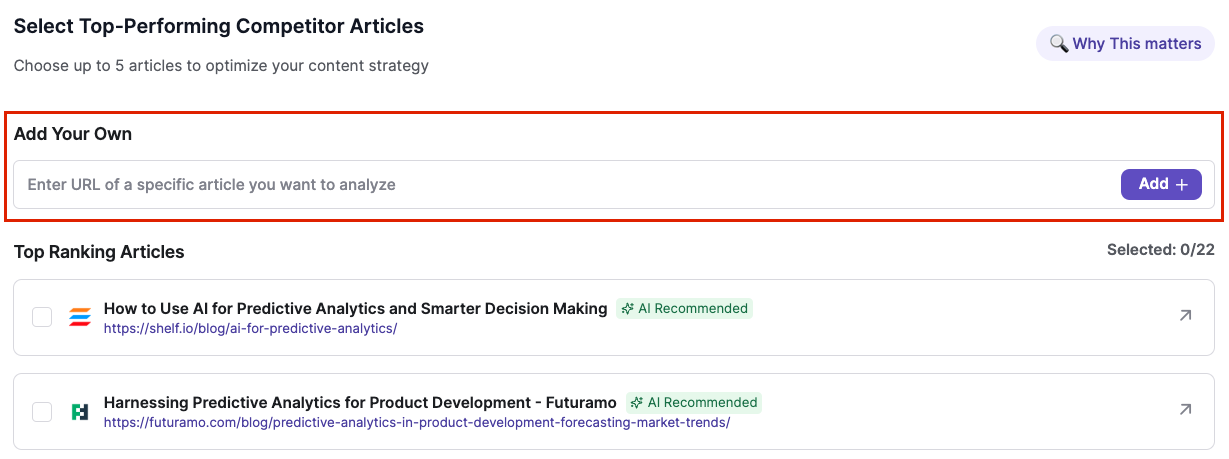
2. Top Ranking Articles
Below the “Add Your Own” section, you’ll find a list of “Top Ranking Articles” related to your chosen topic:
- Each article is displayed with its title, URL, and the website it’s from.
- Some articles may have an “AI Recommended” tag, indicating they’re particularly relevant to your topic.
- You can select up to 5 articles from this list.
- To select an article, click the checkbox on the left side of the article entry.
- To view the full article, click the arrow icon on the right side of the entry.
Selection: At the top right of the “Top Ranking Articles” section, you’ll see a counter showing how many articles you’ve selected out of the maximum allowed:
Additional Features
- Why This matters: At the top right of the page, you’ll see a purple “Why This matters” button. Clicking this will provide more information about the importance of selecting competitor articles.
- Progress Tracker: On the left side, you can see your progress through the 10 steps. “Select References” is now highlighted, showing you’re on Step 3.
- Back Button: At the bottom left, there’s a “Back” button if you need to return to Step 2.
- Pick for me: Next to the “Continue” button, there’s a “Pick for me” option. This allows the AI to select articles for you if you’re unsure.
- Continue Button: Once you’ve made your selections, click the purple “Continue” button at the bottom right to move to Step 4.
Tips for Optimizing:
1. Custom URL Addition:
- Use the “Add Your Own” feature to include articles from trusted sources in your industry.
- Consider adding articles from your own website to ensure your new content aligns with your existing style and information.
2. Selecting Top Ranking Articles:
- Prioritize articles with the “AI Recommended” tag, as these are likely most relevant to your topic.
- Choose a mix of articles from different sources to get a broad perspective on your topic.
- Pay attention to the titles and try to select articles that cover different aspects of your topic.
3. Number of Selections:
- While you can select up to 30 articles, it’s often better to choose quality over quantity.
- Aim for 5-10 highly relevant articles rather than selecting the maximum number.
4. Review Process:
- Take the time to click through and quickly scan the articles you’re considering.
- Ensure the selected articles are recent and contain accurate information.
5. Balancing Perspectives:
- Try to include articles with different viewpoints or approaches to your topic for a well-rounded analysis.
6. Consider Your Article Type:
- If you’re writing a technical article, prioritize in-depth, data-driven pieces.
- For a blog post, you might want to include some more conversational or opinion-based articles.
7. Use of “Pick for me”:
- If you’re new to the topic or unsure which articles are best, don’t hesitate to use the “Pick for me” option.
- You can always review and adjust the AI’s selections before continuing.
By carefully selecting your reference articles, you’re providing the AI with valuable context and competitive insights. This will help ensure your final article is well-informed, competitive, and aligned with current trends in your topic area.
Step 4: Choose a Primary Keyword
After selecting your reference articles, you’ll move to the “Choose a Primary Keyword” page. This step is crucial for anchoring your content and driving SEO performance. Let’s break down each element on this page:
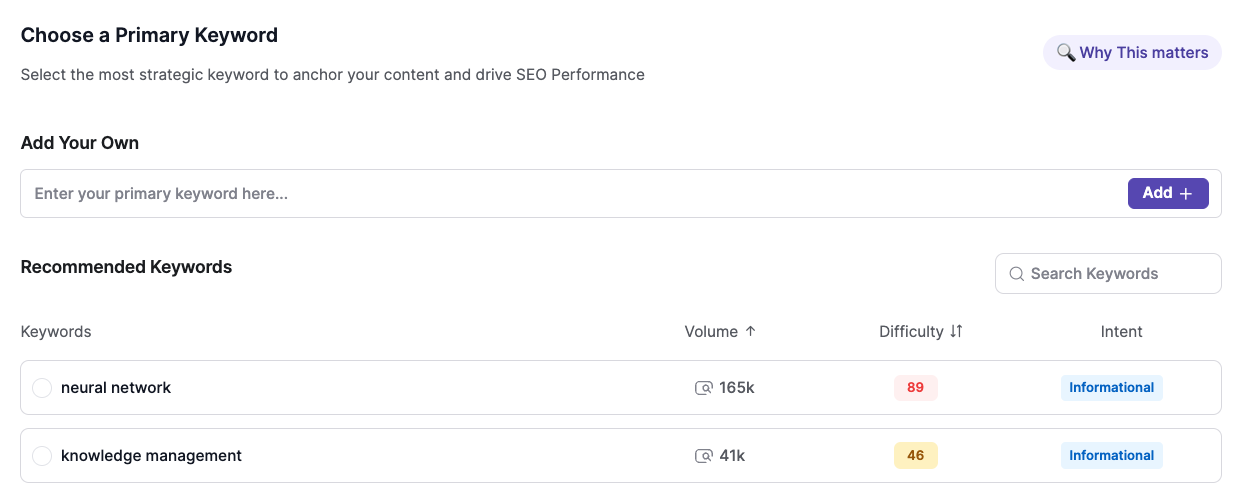
1. Add Your Own
At the top of the page, you’ll see a text field labeled “Enter your primary keyword here…”:
- Use this field to input a specific keyword you want to target in your article.
- After entering the keyword, click the purple “Add +” button on the right to include it.
- This feature is useful if you have a particular keyword in mind that isn’t listed in the recommendations.

2. Recommended Keywords
Below the “Add Your Own” section, you’ll find a list of “Recommended Keywords” related to your chosen topic:
- Each keyword is displayed with additional information to help you make an informed decision:
- Volume: The average monthly search volume for the keyword.
- Difficulty: A score indicating how challenging it might be to rank for this keyword.
- Intent: The likely purpose behind searches for this keyword (e.g., Informational, Commercial).
- Some keywords may have an “AI Recommended” tag, indicating they’re particularly relevant to your topic.
- To select a keyword, simply click on it. The selected keyword will be highlighted.

3. Search Keywords
At the top right of the “Recommended Keywords” section, you’ll see a search bar:
- Use this to filter the list of keywords if you’re looking for something specific.
- Type in part of a keyword, and the list will update to show matching results.

Additional Features
- Why This matters: At the top right of the page, you’ll see a purple “Why This matters” button. Clicking this will provide more information about the importance of selecting a primary keyword.
- Pick for me: Next to the “Continue” button, there’s a “Pick for me” option. This allows the AI to select a primary keyword for you if you’re unsure.
Tips for Optimizing Step 4:
1. Understanding Keyword Metrics:
- Volume: Higher numbers indicate more searches, but also potentially more competition.
- Difficulty: Lower numbers (green) are easier to rank for, while higher numbers (red) are more challenging.
- Intent: Choose keywords that match your content’s purpose (e.g., “Informational” for educational content).
2. Balancing Volume and Difficulty:
- Aim for keywords with a good balance of search volume and difficulty.
- For new websites, prioritize lower difficulty keywords to increase ranking chances.
3. Relevance is Key:
- Ensure the chosen keyword accurately represents your article’s main topic.
- Consider how well you can address the keyword in your content.
4. Long-Tail Keywords:
- Don’t overlook longer, more specific keywords. They often have less competition and more focused intent.
5. Consider Your Article Type:
- For technical articles, you might prioritize more specific, industry-related keywords.
- For blog posts, broader keywords with higher search volumes might be more appropriate.
6. Use of “AI Recommended”:
- Pay special attention to keywords with the “AI Recommended” tag, as these are likely most relevant to your topic.
7. Custom Keywords:
- If you have a specific keyword strategy or want to target a niche term, don’t hesitate to use the “Add Your Own” feature.
8. Think About User Intent:
- Consider what kind of content users are looking for when they search for your chosen keyword.
- Ensure your article will satisfy the searcher’s intent.
By carefully selecting your primary keyword, you’re setting the foundation for an SEO-optimized article that has the potential to rank well in search results and attract your target audience.
Step 5: Choose an Engaging Title
After selecting your primary keyword, you’ll move to the “Choose an engaging Title” page. This step is crucial for capturing reader attention and maximizing SEO impact. Let’s break down each element on this page:
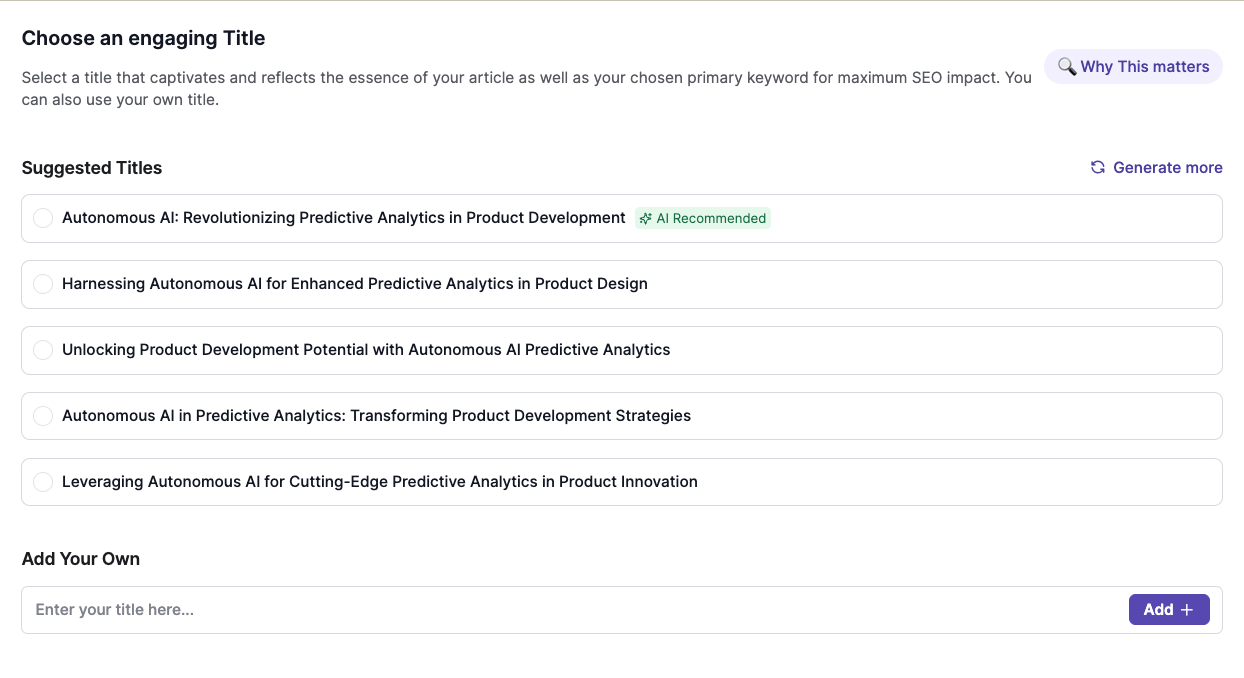
1. Suggested Titles
At the top of the page, you’ll see a list of “Suggested Titles”:
- These titles are AI-generated based on your topic, primary keyword, and article type.
- The first title is usually highlighted and marked as “AI Recommended”.
- To select a title, simply click on it. The selected title will be highlighted in purple.
- You can view up to 5 suggested titles initially.
2. Generate More Titles
If you’re not satisfied with the initial suggestions:
- Look for the “Generate more” link at the top right of the Suggested Titles section.
- Clicking this will produce additional title options for you to consider.
3. Add Your Own
At the bottom of the page, you’ll find an “Add Your Own” section:
- Use the text field labeled “Enter your title here…” to input a custom title.
- After entering your title, click the purple “Add +” button on the right to include it.
- This feature is useful if you have a specific title in mind or want to modify one of the suggestions.

Additional FeaturesWhy This matters: At the top right of the page, you’ll see a purple “Why This matters” button. Clicking this will provide more information about the importance of selecting an engaging title.
Pick for me: Next to the “Continue” button, there’s a “Pick for me” option. This allows the AI to select a title for you if you’re unsure.
Tips for Optimizing Step 5:
1. Incorporate Your Primary Keyword:
- Ensure your chosen title includes your primary keyword, preferably near the beginning.
- This helps with SEO and immediately signals to readers what your article is about.
2. Keep It Concise:
- Aim for a title length of 50-60 characters to ensure it displays fully in search engine results.
3. Use Power Words:
- Include words that evoke emotion or curiosity, such as “Essential”, “Surprising”, or “Proven”.
4. Consider Your Article Type:
- For technical articles, focus on clarity and specificity.
- For blog posts, you might use more engaging or provocative language.
5. Reflect the Content:
- Ensure your title accurately represents the content of your article to avoid misleading readers.
6. Use Numbers or Lists:
- Titles with numbers (e.g., “7 Ways to…”) often perform well as they set clear expectations for the reader.
7. Ask Questions:
- Titles framed as questions can pique curiosity and encourage clicks.
8. Avoid Clickbait:
- While your title should be engaging, ensure it’s not misleading or overly sensational.
9. Brand Consistency:
- If you’re writing for a specific brand or publication, ensure your title aligns with their style and tone.
By carefully selecting or crafting your title, you’re setting the stage for your article’s success, both in terms of SEO performance and reader engagement. Remember, the title is often the first (and sometimes only) thing potential readers see, so it’s worth taking the time to get it right.
Step 6: Choose Secondary Keywords
After selecting your article title, you’ll move to the “Choose Secondary Keywords” page. This step is crucial for enhancing your content’s SEO and supporting your primary topic. Let’s break down each element on this page:
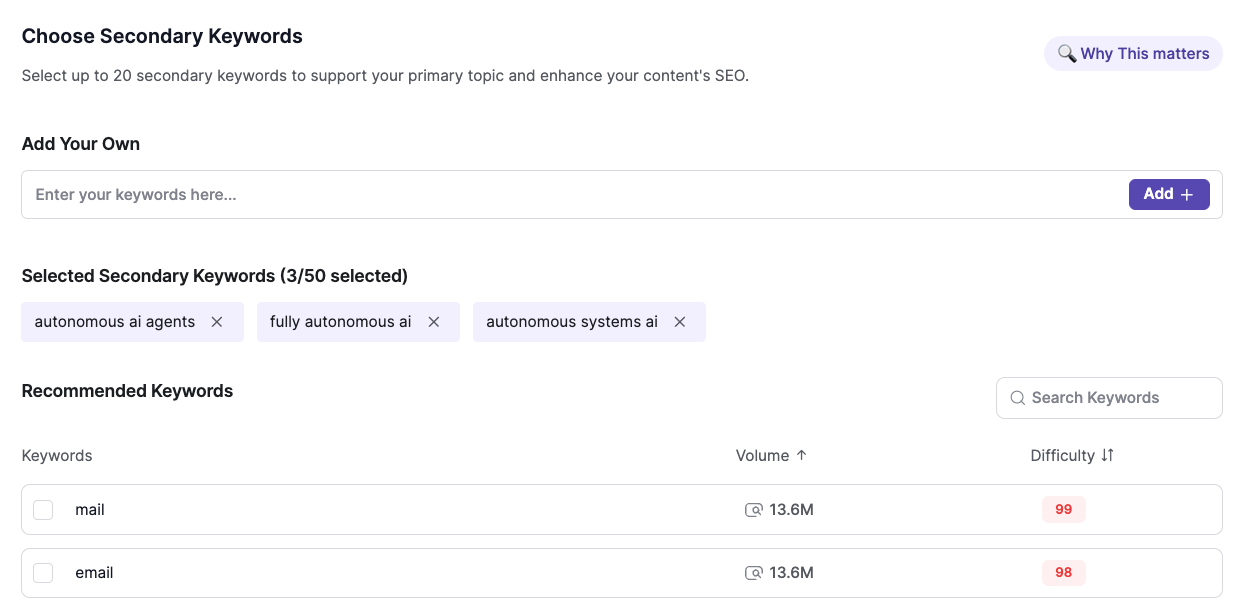
1. Add Your Own
At the top of the page, you’ll see a text field labeled “Enter your keywords here…”:
- Use this field to input specific secondary keywords you want to include in your article.
- After entering your keywords, click the purple “Add +” button on the right to include them.
- This feature is useful if you have particular keywords in mind that aren’t listed in the recommendations.

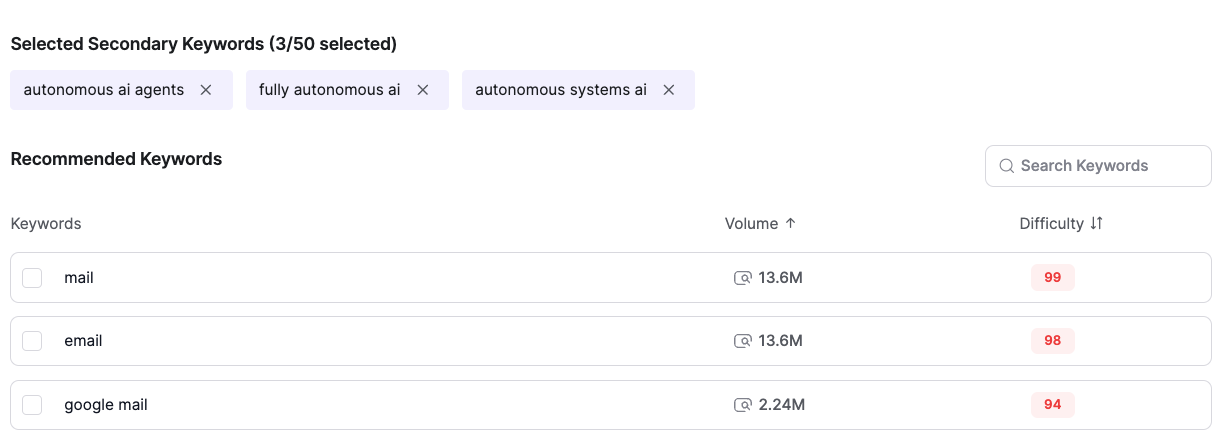
2. Selected Secondary Keywords
Below the “Add Your Own” section, you’ll find a display of your “Selected Secondary Keywords”:
- This area shows the keywords you’ve already chosen.
- Each selected keyword appears in a purple box with an “x” next to it.
- You can remove a selected keyword by clicking the “x”.
- The display also shows how many keywords you’ve selected out of the maximum allowed (e.g., “2/29 selected”).
3. Recommended Keywords
The main part of the page displays a list of “Recommended Keywords”:
- Each keyword is shown with its search volume and difficulty score.
- Volume is represented by a number with an eye icon, indicating monthly search volume.
- Difficulty is shown as a number from 0-100, with lower numbers (in green) being easier to rank for.
- Some keywords may have an “AI Recommended” tag, indicating they’re particularly relevant to your topic.
- To select a keyword, click the checkbox next to it.
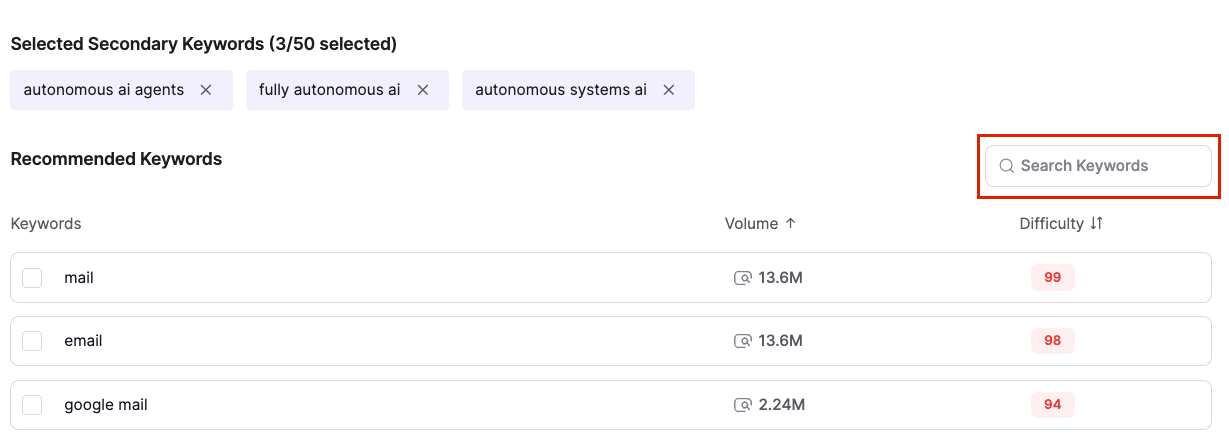
4. Search Keywords
At the top right of the “Recommended Keywords” section, you’ll see a search bar:
- Use this to filter the list of keywords if you’re looking for something specific.
- Type in part of a keyword, and the list will update to show matching results.
Additional Features
- Why This matters: At the top right of the page, you’ll see a purple “Why This matters” button. Clicking this will provide more information about the importance of selecting secondary keywords.
- Pick for me: Next to the “Continue” button, there’s a “Pick for me” option. This allows the AI to select secondary keywords for you if you’re unsure.
Tips for Optimizing Step 6:
1. Relevance is Key:
- Choose secondary keywords that are closely related to your primary keyword and main topic.
- Ensure each selected keyword can be naturally incorporated into your content.
2. Consider Search Volume and Difficulty:
- Aim for a mix of high-volume and low-difficulty keywords to balance reach and ranking potential.
- Don’t ignore low-volume keywords if they’re highly relevant to your niche.
3. Use Long-Tail Keywords:
- Include some longer, more specific phrases as secondary keywords.
- These often have less competition and can help you target more specific search queries.
4. Diversify Your Keywords:
- Select a variety of keywords that cover different aspects of your topic.
- This helps create a more comprehensive and valuable article for readers.
5. Mind Your Keyword Count:
- While you can select up to 29 keywords, it’s often better to focus on quality over quantity.
- Aim for 10-15 highly relevant secondary keywords for most articles.
6. Consider User Intent:
- Choose keywords that align with the intent of your article (informational, commercial, etc.).
- This helps ensure your content meets the expectations of searchers using these terms.
7. Look for Question-Based Keywords:
- Including question-form keywords can help your content appear in featured snippets and voice search results.
8. Use AI Recommendations:
- Pay special attention to keywords marked as “AI Recommended” as they’re likely to be highly relevant to your topic.
9. Think About Content Structure:
- As you select keywords, consider how you might organize your content to naturally include these terms.
- Some keywords might become subheadings or section topics within your article.
10. Balance New and Familiar Terms:
- Include some keywords that your target audience is likely familiar with, as well as some that might introduce new concepts or perspectives.
By carefully selecting your secondary keywords, you’re laying the groundwork for a well-optimized, comprehensive article that addresses various aspects of your main topic. This approach can help improve your content’s visibility in search results and provide more value to your readers.
Step 7: Configurations
After selecting your secondary keywords, you’ll move to the “Tailor Your Article” page. This step allows you to customize your content to perfectly match your audience’s needs and your brand’s voice. Let’s break down each element on this page:
1. Article Structure and Length
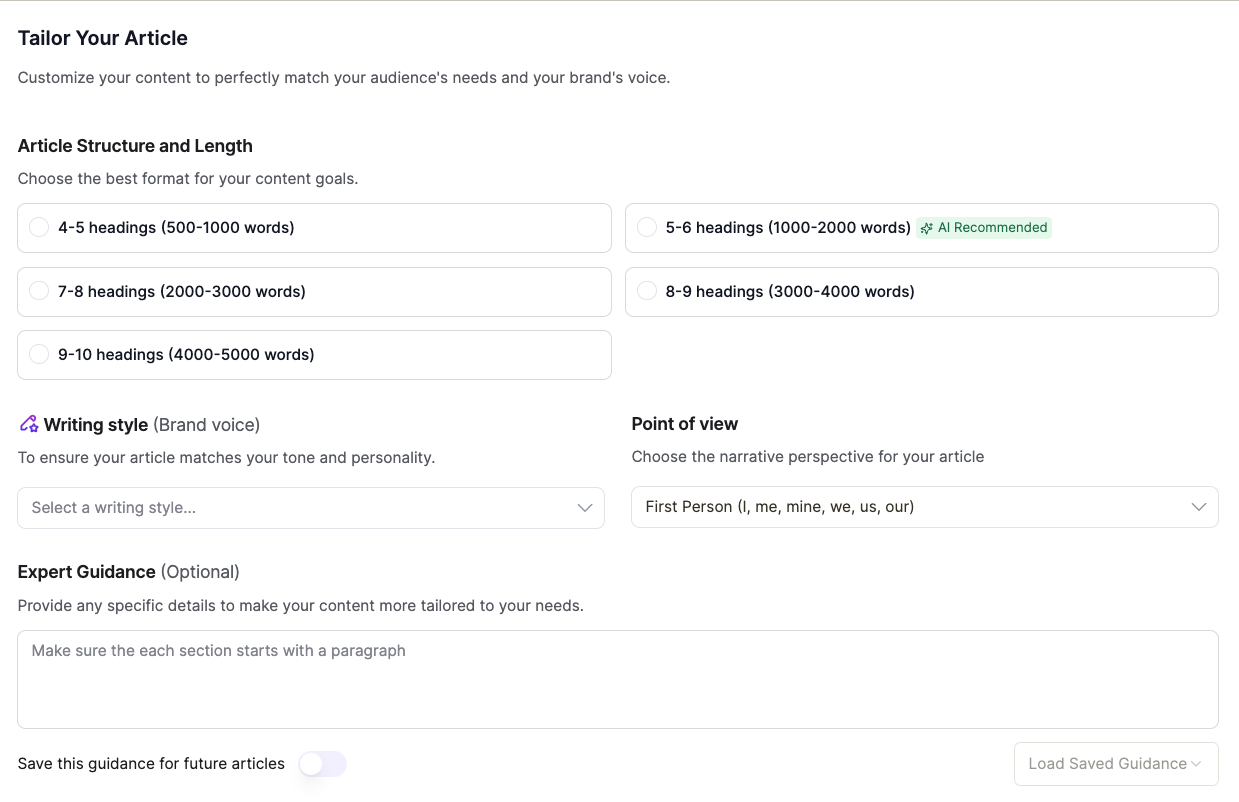
At the top of the page, you’ll see options for “Article Structure and Length”:
- 4-5 headings (500-1000 words): Best for quick reads or social media posts
- 5-6 headings (1000-2000 words): Ideal for blog posts or short articles
- 7-8 headings (2000-3000 words): Great for in-depth guides or pillar content
- 8-9 headings (3000-4000 words): Perfect for comprehensive guides and tutorials
- 9-10 headings (4000-5000 words): Ideal for ultimate guides and whitepapers
Choose the option that best fits your content goals and target audience. The AI-recommended option is highlighted, but you can select any that suits your needs.

2. Content Style
Below the structure options, you’ll find two dropdown menus for “Content Style”:
a) Brand voice:
- Click on “Please select a Brand voice” to choose a writing style that matches your brand’s personality.
- Options might include formal, casual, professional, friendly, etc.
b) Point of view:
- Choose between First Person (I, me, mine, we, us, our), Second Person (you, your, yours), or Third Person (he, she, they).
- This determines how the article will address the reader and refer to the author(s).

3. Expert Guidance (Optional)
This section allows you to provide additional instructions for the AI:
- Use the text field to enter specific guidance for your article.
- You can specify detailed outline preferences, provide content-specific instructions, or add any other relevant details.
- Example: “Make sure the each section starts with a paragraph”
- Note: Image, linking, and citation instructions are not applicable in this field.

4. Save this guidance for future articles
Below the Expert Guidance field, you’ll see a toggle switch:
- Turn this on if you want to save your configurations for future use.
- This can help maintain consistency across multiple articles.
Load Saved Guidance
At the bottom right of the Expert Guidance section, there’s a “Load Saved Guidance” button:
- Click this to apply previously saved configurations.
- This is useful if you’re creating a series of articles with similar requirements.
Additional Features
- How this works: Next to the Point of view dropdown, there’s an information icon. Clicking this will provide more details about how the point of view affects your content.
- Pick for me: Next to the “Continue” button, there’s a “Pick for me” option. This allows the AI to make configurations for you if you’re unsure.
Tips for Optimizing Step 7:
1. Match Structure to Content Type:
- Choose a structure that aligns with your content goals and audience expectations.
- Longer structures are better for comprehensive guides, while shorter ones work well for quick, focused pieces.
2. Consider Your Audience:
- Select or Create a brand voice that resonates with your target readers.
- Choose a point of view that creates the right level of connection with your audience.
3. Be Specific in Expert Guidance:
- Use the Expert Guidance field to provide clear, actionable instructions.
- Include any specific requirements for section organization, tone, or content focus.
4. Maintain Consistency:
- If you’re creating a series of related articles, use the save and load features to maintain a consistent style.
5. Balance AI Recommendations and Your Needs:
- While the AI provides recommendations, don’t hesitate to choose different options if they better suit your specific requirements.
7. Think About SEO:
- Consider how your structure and style choices might impact SEO. Longer, more comprehensive articles often perform well for certain topics.
8. Align with Your Overall Content Strategy:
- Ensure your configurations align with your broader content marketing goals and brand guidelines.
By carefully configuring these settings, you’re ensuring that the AI-generated content will closely match your brand’s voice and meet your specific content needs. This step is crucial for creating articles that feel authentic and resonate with your target audience.
Step 8: Select an Outline to Structure Your Content
After configuring your article settings, you’ll move to the “Select an Outline to Structure Your Content” page. This step is crucial for organizing your article’s flow and structure. Let’s break down each element and feature on this page:
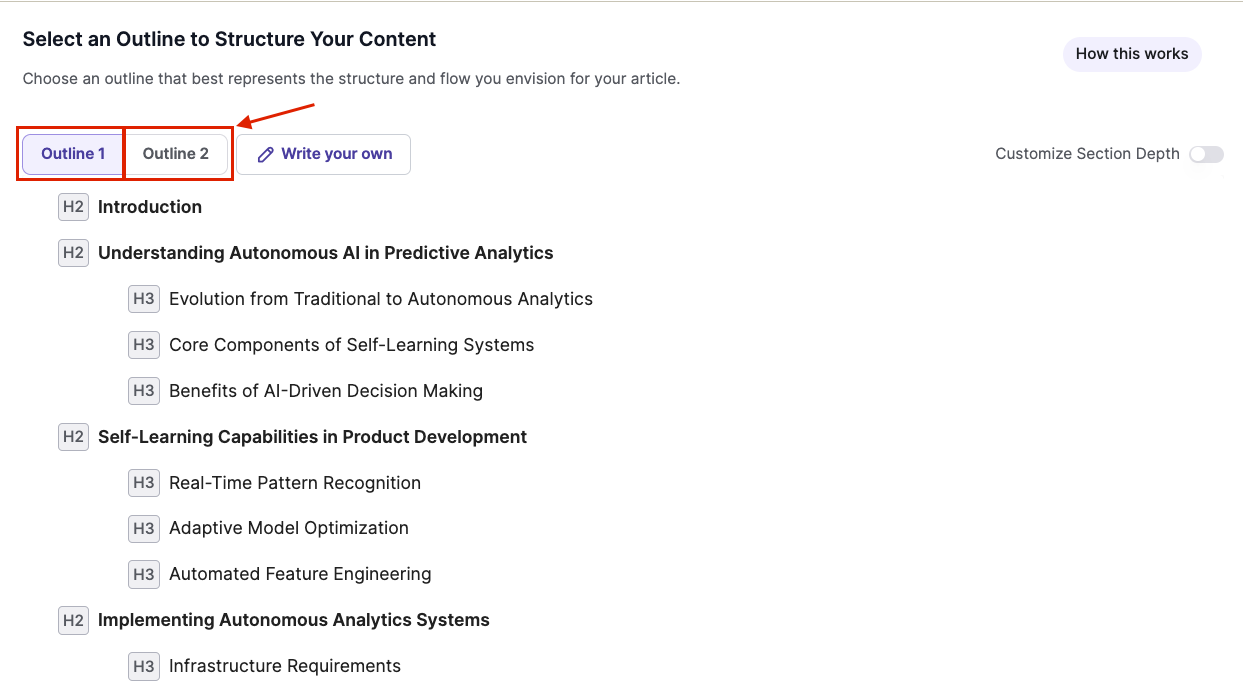
1. Outline Selection
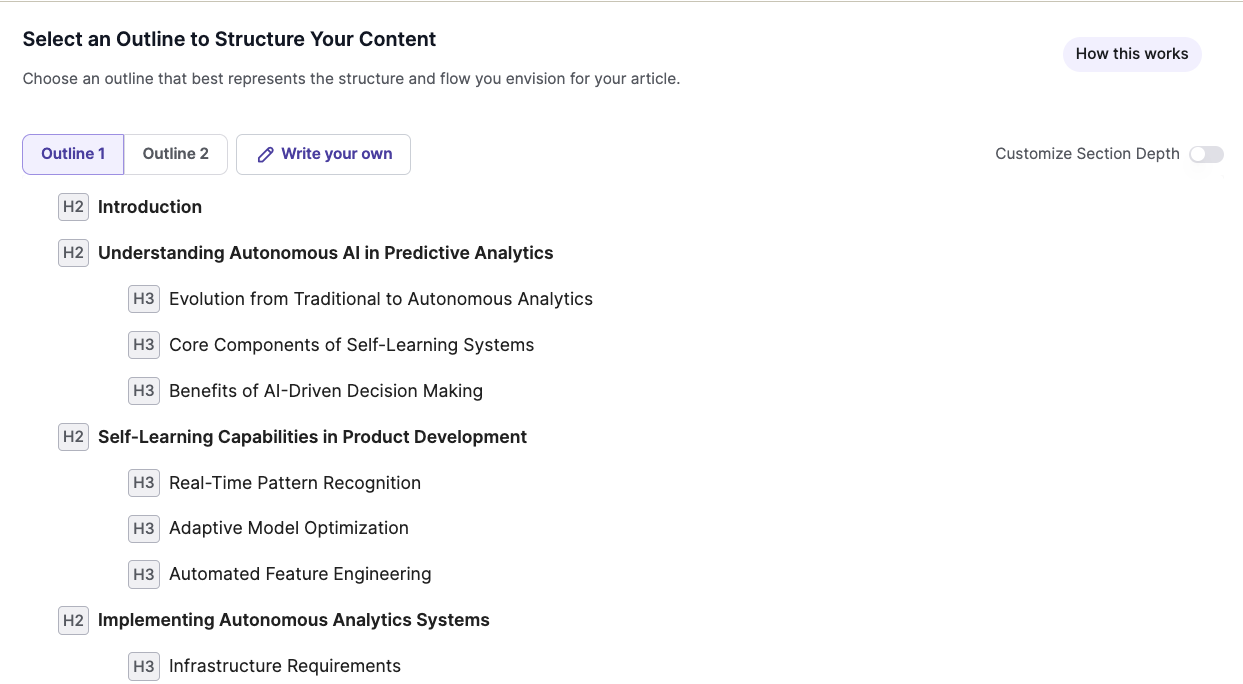
At the top of the page, you’ll see three options for selecting an outline:
- Outline 1: This is the default AI-generated outline based on your previous inputs.
- Outline 2: An alternative AI-generated outline for comparison.
- Write your own: Allows you to create a custom outline from scratch.
2. Outline Display
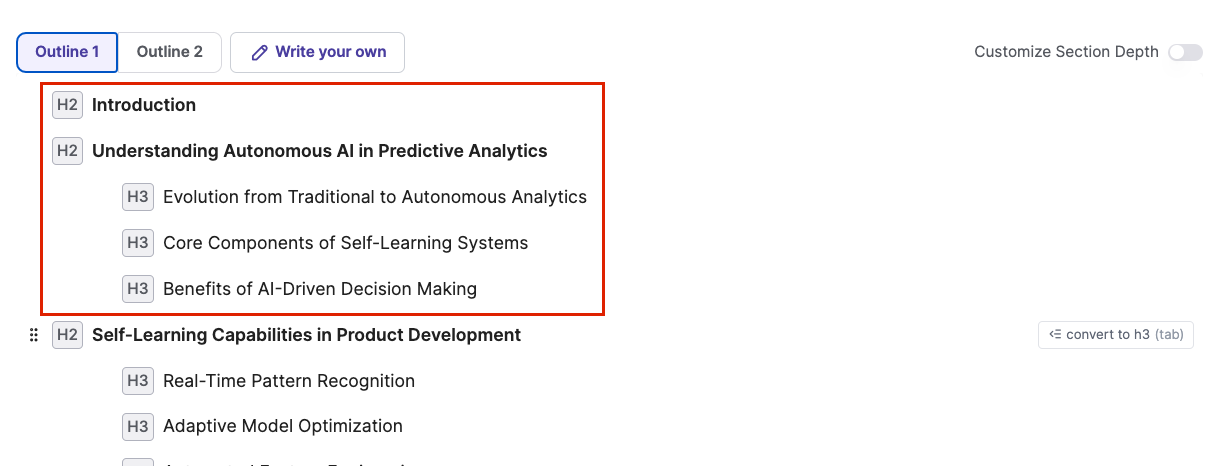
The main part of the page shows the selected outline:
- Headings are displayed in a hierarchical structure with H2 and H3 levels.
- H2 headings represent main sections, while H3 headings are subsections.
- Each heading is preceded by an icon indicating its level (H2 or H3).
3. Smart Structure Features
The outline creation process offers several advanced features:
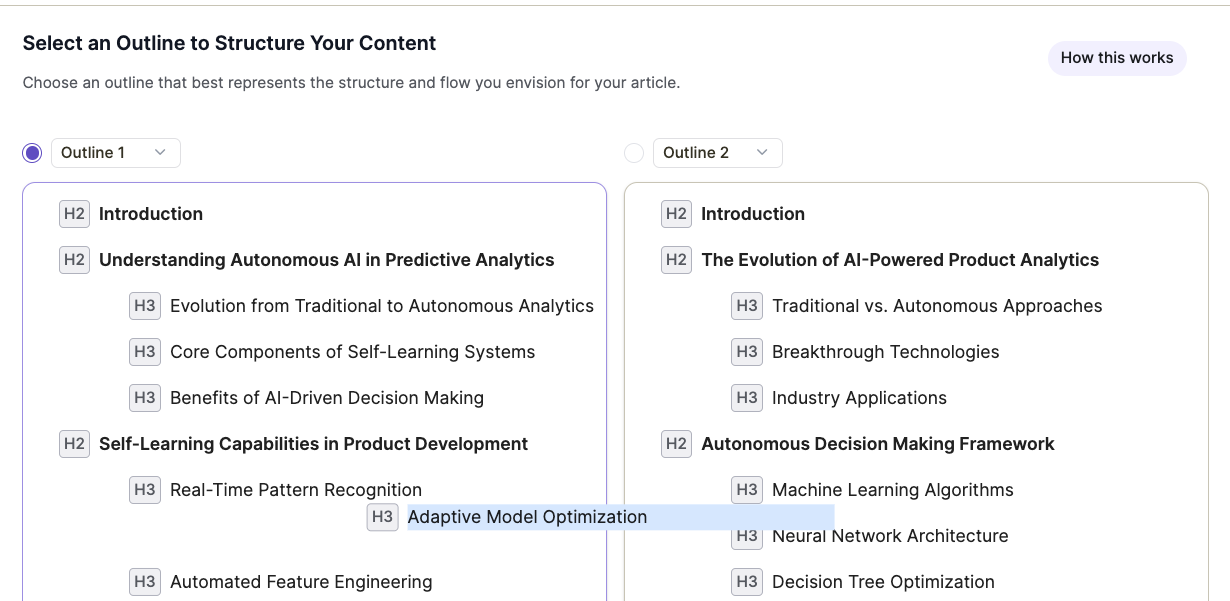
a) Drag-and-Drop Functionality:
- Click and hold any heading to drag it to a new position in the outline.
- This allows you to easily rearrange sections and subsections.
b) Keyboard Shortcuts:
- Use keyboard shortcuts to quickly move headings up or down in the outline.
- This feature enables efficient restructuring without using the mouse.
c) Side-by-Side Comparison:
- Toggle between “Default view” and “Split view” at the bottom of the page.
- In Split view, you can see two outlines side by side for easy comparison.
- Mix and match elements from both outlines to create your ideal structure.

4. Customize Section Depth
At the top right of the page, you’ll find a “Customize Section Depth” toggle:
- Activating this feature allows you to set specific content depth requirements for each section.
- This is useful for ensuring certain topics receive more detailed coverage than others.
Additional Features
- How this works: At the top right of the page, there’s an information icon. Clicking this will provide more details about how to use the outline selection and customization features.
Tips for Optimizing Step 8:
1. Review Both AI-Generated Outlines:
- Take the time to compare Outline 1 and Outline 2 to see which better suits your vision for the article.
- Don’t hesitate to mix elements from both outlines if it improves the overall structure.
2. Use the Drag-and-Drop Feature:
- Experiment with different arrangements of your headings to find the most logical flow.
- Consider moving related subtopics closer together for better coherence.
3. Leverage Keyboard Shortcuts:
- Learn and use the keyboard shortcuts for faster and more efficient outline editing.
- This can be particularly helpful when making multiple small adjustments.
4. Utilize the Side-by-Side Comparison:
- Use the Split view to easily compare different outline structures.
- This feature is especially useful when you’re unsure which arrangement works best.
5. Customize Section Depth Thoughtfully:
- Use the Customize Section Depth feature to allocate more content to complex or crucial topics.
- Ensure that the depth of each section aligns with its importance to the overall article.
6. Maintain a Logical Flow:
- Ensure that your outline follows a logical progression of ideas.
- Consider starting with broader concepts and moving to more specific details.
7. Balance Your H2 and H3 Headings:
- Aim for a balanced use of H2 (main sections) and H3 (subsections) headings.
- Too many H2s can make the article feel disjointed, while too many H3s under one H2 can make that section feel overwhelming.
8. Align with SEO Goals:
- Ensure that your primary and secondary keywords are represented in your headings.
- Consider how your outline structure might impact the article’s SEO performance.
9. Think About Reader Experience:
- Organize your outline in a way that guides the reader smoothly through the topic.
- Consider placing more complex or technical sections after introductory or explanatory content.
10. Don’t Hesitate to Write Your Own:
- If neither AI-generated outline fully captures your vision, use the “Write your own” option to create a custom structure.
- This can be particularly useful for highly specialized or unique topics.
By carefully crafting your outline, you’re setting a strong foundation for a well-structured, coherent article that effectively communicates your ideas and meets your content goals.
Step 9: Enhance your Article
After selecting your article’s outline, you’ll move to the “Enhance your Article” page. This step offers several optional features to customize your content and boost engagement and SEO. Let’s break down each element on this page:
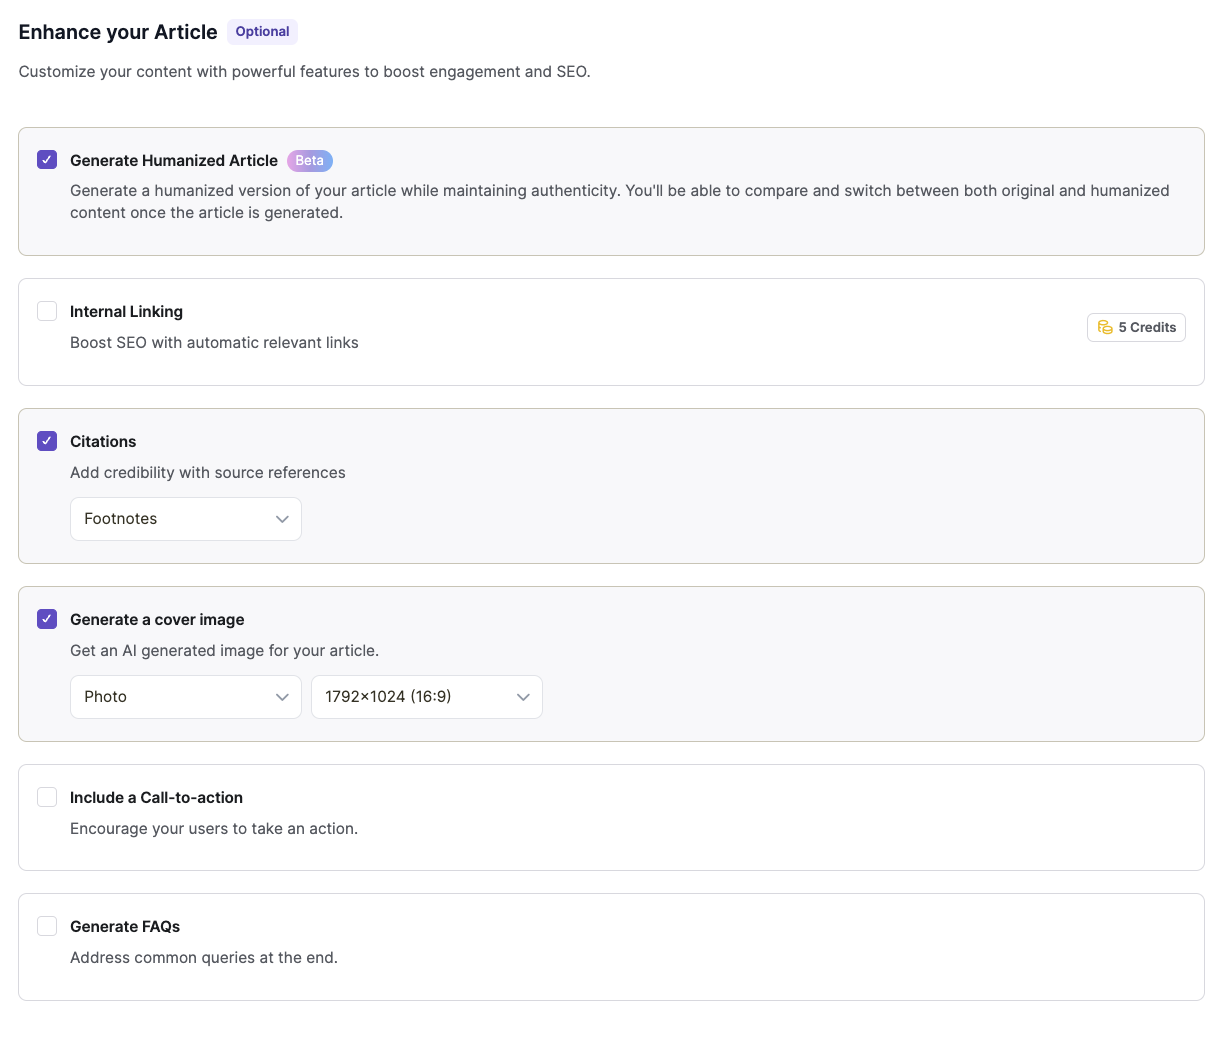
1. Generate Humanized Article
- This option is marked with a “Beta” tag, indicating it’s a new or experimental feature.
- When selected, it generates a humanized version of your article while maintaining authenticity.
- After generation, you’ll be able to compare and switch between the original and humanized content.
- This feature can help make your content sound more natural and engaging.
2. Internal Linking
- This option helps boost SEO by adding automatic relevant links within your article.
- It costs 5 Credits to use this feature.
- Internal linking can improve your website’s structure and help distribute page authority throughout your site.
3. Citations
- This feature adds credibility to your article by including source references.
- You can choose the citation style from a dropdown menu (e.g., Footnotes).
- Citations help support your claims and provide readers with additional resources.
4. Generate a cover image
- This option allows you to get an AI-generated image for your article.
- You can select the image type (e.g., Photo) and dimensions (e.g., 1792x1024 (16:9)) from dropdown menus.
- A cover image can make your article more visually appealing and increase engagement.
5. Include a Call-to-action
- This feature encourages your users to take a specific action after reading your article.
- Call-to-actions can help improve conversion rates and guide readers to the next step you want them to take.
6. Generate FAQs
- This option adds a Frequently Asked Questions section at the end of your article.
- FAQs can address common queries, improve user experience, and potentially boost SEO by targeting question-based searches.
Additional Features
- Optional label: At the top of the page, you’ll see that these enhancements are marked as “Optional”, meaning you can choose which ones to include.
- Draft selector: At the top left, you can see which draft of your article you’re working on.
Tips for Optimizing Step 9:
1. Consider Your Content Goals:
- Choose enhancements that align with your article’s purpose and target audience.
- For example, if you’re writing a research-heavy piece, citations might be crucial.
2. Balance SEO and Readability:
- While features like internal linking can boost SEO, ensure they don’t disrupt the flow of your content.
3. Use the Humanized Article Feature Wisely:
- This can be particularly useful for technical topics that need a more conversational tone.
- Always review the humanized version to ensure it maintains your intended message.
4. Leverage Visual Elements:
- A cover image can significantly enhance the appeal of your article, especially when shared on social media.
5. Strategize Your Call-to-Action:
- Ensure your CTA is relevant to the article content and provides clear value to the reader.
6. Maximize FAQ Potential:
- Use the FAQ feature to target long-tail keywords and address common user queries.
- This can improve your article’s chances of appearing in featured snippets.
7. Consider Credit Usage:
- Be mindful of the credit cost for features like internal linking, especially if you’re on a limited plan.
8. Maintain Consistency:
- If you’re creating a series of articles, try to use similar enhancement features for a cohesive feel.
9. Review and Refine:
- After applying enhancements, always review your article to ensure they integrate smoothly with your content.
10. Experiment and Analyze:
- Try different combinations of enhancements and analyze their impact on your article’s performance over time.
By carefully selecting and implementing these enhancements, you can significantly improve your article’s engagement, credibility, and search engine performance. Remember, while these features are powerful, the core quality of your content remains the most important factor.
Updated 5 months ago
